How to Run Multiple Laravel Sail Projects on the Same PC

In a previous post, we explained how to run Laravel applications on different ports. That approach is suitable for simple scenarios which use shared services with all the applications. But how to create completely isolated, multiple environments for every application? Of course, we can use Laravel Sail. Laravel Sail provides a complete development environment conveniently less than in 5 seconds. But the question is, how can we run multiple Laravel Sail projects at the same time on the same PC? The main problem here is all the Laravel applications, database servers, mail servers and every service trying to use the same ports. As a result of that, only the first Laravel Sail project will run and all other projects will be failed to start.
In this post, you will be able to learn how to run multiple isolated Laravel Sail development environments on a PC. Mainly we explain how to run the following services in your Laravel projects.
- Laravel application
- Database servers (MySQL, MariaDB and PostgreSQL)
- MailHog
- Redis
- Memcached
- Minio
But you will be able to apply the same concept to any other services that you may use as well. Also, even though we explained how to run all these services, you only need to configure the services that you use in your projects. At the end, we are going to test each service with test cases to make sure every service is working as expected. So make sure to remove all the test cases for unused services.
Laravel Application
The very first and the most important thing is to change the Laravel application port. Usually, it runs on port 80, so you can use another port to avoid port conflicts. Open the .env file of a Laravel project and add a new environment variable called APP_PORT. For convenience, we assign the port 8081 for the first project like below.
APP_PORT=8081
Apply incrementing ports 8082, 8083,.. for other Laravel projects as well. Make sure not to use the same port for any of the services.
Database Servers
Laravel mainly supports 3 DBMS (Database Management Systems) namely, MySQL, PostgreSQL and MariaDB. In addition to that, Laravel supports SQLite as well, but since it is a file-based database there is no need to do any additional configuration other than the
SQLite database configuration. All the main 3 DBMS services check the FORWARD_DB_PORT environment variable when starting the container. So, likewise we changed the APP_PORT, now we are going to change the database port as well. Add the following line to the .env file with different port numbers to all the Laravel projects. Usually, both MySQL and MariaDB use the port 3306 as the default port while PostgreSQL uses port 5432. So you can assign something like 33061 or 54321 as the port. Assign port 33062, 33063,.. for other Laravel projects. Again, make sure to avoid using the same port.
FORWARD_DB_PORT=33061
MailHog
MailHog mainly expect two ports called FORWARD_MAILHOG_PORT and FORWARD_MAILHOG_DASHBOARD_PORT. Change them accordingly in the .env files with incrementing values for all the Laravel projects.
FORWARD_MAILHOG_PORT=1021
FORWARD_MAILHOG_DASHBOARD_PORT=8021
But still, emails will not be delivered unless you assign an email address to the MAIL_FROM_ADDRESS environment variable in the .env file. So update that following line.
MAIL_FROM_ADDRESS=[email protected]
Redis
Redis uses the port 6379, so create an environment variable called FORWARD_REDIS_PORT in all the Laravel projects and assign unique incrementing ports for all the .env files.
FORWARD_REDIS_PORT=63791
Memcached
At the moment of writing this post, the Laravel Sail docker-compose.yml file does not load custom ports from the .env file. Instead, it loads the hardcoded port 11211 in the docker-compose.yml file. But we can easily change it so open the docker-compose.yml file and scroll down till you see the memcached service. Then add the FORWARD_MEMCACHED_PORT environment variable to its port like below.
memcached:
    image: 'memcached:alpine'
    ports:
        - '${FORWARD_MEMCACHED_PORT:-11211}:11211'
    networks:
        - sail
After that, open the .env file and add incrementing ports for all the Laravel projects.
FORWARD_MEMCACHED_PORT=11211
Minio
Minio expects two environment variables called FORWARD_MINIO_PORT and FORWARD_MINIO_CONSOLE_PORT. Add the following two lines to the .env file of all the Laravel projects with incrementing ports.
FORWARD_MINIO_PORT=9001
FORWARD_MINIO_CONSOLE_PORT=8901
Also, update the values of the following environment variables as they are without changing any value.
FILESYSTEM_DRIVER=s3
AWS_ACCESS_KEY_ID=sail
AWS_SECRET_ACCESS_KEY=password
AWS_DEFAULT_REGION=us-east-1
AWS_BUCKET=local
AWS_ENDPOINT=http://minio:9000
AWS_USE_PATH_STYLE_ENDPOINT=true
Test Service Configurations
Ultimately, since we may have dozens of services in multiple projects, checking each service manually one by one can be a bit cumbersome. So, now we are going to write some test cases to automate it to quickly check whether all the services are properly running or not. However, this testing step is not mandatory and completely optional.
Create a feature test by running the following make:test command.
php artisan make:test ConfigTest
It will create a file called ConfigTest.php in the tests/Feature directory. Add the following test cases into the ConfigTest.php file according to the services that you use.
Laravel Application Testing
The following test case will check whether the application is working or not.
public function test_app()
{
    $response = $this->get('/');

    $response->assertStatus(200);
}
Database Service Testing
This test case will try to create a database record and retrieve it to check whether the database is working properly or not.
use RefreshDatabase;

public function test_database()
{
    \App\Models\User::factory()->create([
        'email' => '[email protected]',
    ]);

    $this->assertDatabaseHas('users', [
        'email' => '[email protected]',
    ]);
}
Redis Service Testing
The test_redis() test case will try to check whether the Redis service is properly running or not by trying to write and read some data.
public function test_redis()
{
    $input = 'redis secret';

    \Illuminate\Support\Facades\Cache::store('redis')
        ->put('secret', $input, 3);

    $output = \Illuminate\Support\Facades\Cache::store('redis')
        ->get('secret');

    if (\Illuminate\Support\Facades\Cache::store('redis')->has('secret')) {
        $this->assertEquals($input, $output);
    } else {
        $this->assertFalse(true);
    }
}
Memcached Service Testing
The following test case will check whether Memcached is working properly.
public function test_memcached()
{
    $input = 'memcached secret';

    \Illuminate\Support\Facades\Cache::store('memcached')
        ->put('secret', $input, 3);

    $output = \Illuminate\Support\Facades\Cache::store('memcached')
        ->get('secret');

    if (\Illuminate\Support\Facades\Cache::store('memcached')->has('secret')) {
        $this->assertEquals($input, $output);
    } else {
        $this->assertFalse(true);
    }
}
MailHog Service Testing
Add this test case to check the MailHog service.
public function test_mail()
{
    \Illuminate\Support\Facades\Mail::mailer('smtp')
    ->send('welcome', [], function($message) {
        $message->to('[email protected]')
            ->subject('Test Mail');
    });

    $this->assertTrue(true);
}
Minio Service Testing
Add the following test case to check the Minio service.
public function test_minio()
{
    $input = 'minio secret';

    \Illuminate\Support\Facades\Storage::disk('s3')
        ->put('example.txt', $input);

    $output = \Illuminate\Support\Facades\Storage::disk('s3')
        ->get('example.txt');

    $this->assertEquals($input, $output);
}
So ultimately, the final ConfigTest.php file should be something similar to this.
class ConfigTest extends TestCase
{
    use RefreshDatabase;

    public function test_app()
    {
        $response = $this->get('/');

        $response->assertStatus(200);
    }

    public function test_database()
    {
        \App\Models\User::factory()->create([
            'email' => '[email protected]',
        ]);

        $this->assertDatabaseHas('users', [
            'email' => '[email protected]',
        ]);
    }

    public function test_redis()
    {
        $input = 'redis secret';

        \Illuminate\Support\Facades\Cache::store('redis')
            ->put('secret', $input, 3);

        $output = \Illuminate\Support\Facades\Cache::store('redis')
            ->get('secret');

        if (\Illuminate\Support\Facades\Cache::store('redis')->has('secret')) {
            $this->assertEquals($input, $output);
        } else {
            $this->assertFalse(true);
        }
    }

    public function test_memcached()
    {
        $input = 'memcached secret';

        \Illuminate\Support\Facades\Cache::store('memcached')
            ->put('secret', $input, 3);

        $output = \Illuminate\Support\Facades\Cache::store('memcached')
            ->get('secret');

        if (\Illuminate\Support\Facades\Cache::store('memcached')->has('secret')) {
            $this->assertEquals($input, $output);
        } else {
            $this->assertFalse(true);
        }
    }

    public function test_mail()
    {
        \Illuminate\Support\Facades\Mail::mailer('smtp')
        ->send('welcome', [], function($message) {
            $message->to('[email protected]')
                ->subject('Test Mail');
        });

        $this->assertTrue(true);
    }

    public function test_minio()
    {
        $input = 'minio secret';

        \Illuminate\Support\Facades\Storage::disk('s3')
            ->put('example.txt', $input);

        $output = \Illuminate\Support\Facades\Storage::disk('s3')
            ->get('example.txt');

        $this->assertEquals($input, $output);
    }
}
Before running the tests, we need to do a few more things. First,
install the Amazon S3 Storage Driver league/flysystem-aws-s3-v3 package by running the following command.
composer require --with-all-dependencies league/flysystem-aws-s3-v3 "^3.0"
Now everything is almost ready, so start all the Laravel projects one by one by using the sail up -d command.
./vendor/bin/sail up -d
Sometimes, Laravel might not immediately recognize all the configurations we made due to configuration caching. So run the artisan optimize:clear command to clear all the caches.
./vendor/bin/sail php artisan optimize:clear
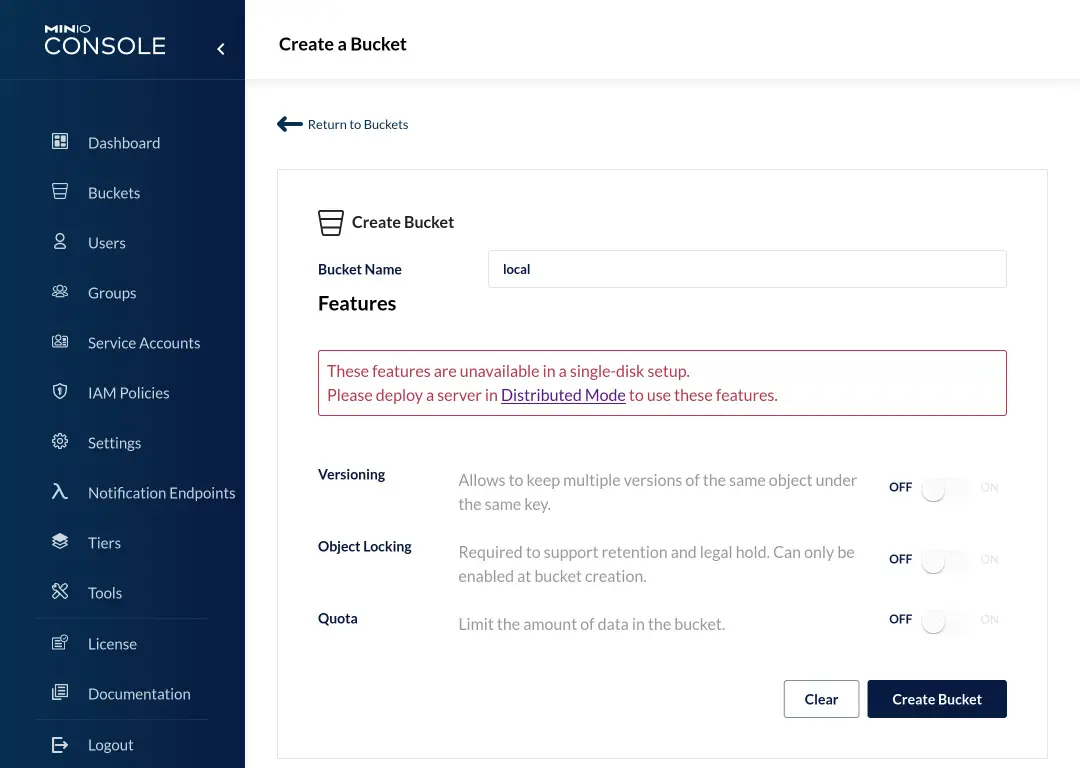
Then create a Minio bucket. So, log in to the Minio dashboard in the browser using the port you mentioned in the FORWARD_MINIO_CONSOLE_PORT. For example,
http://localhost:8901. Default Minio username is “sail” and password is “password”. Now add a new bucket called “local”.
Laravel Sail Minio Dashboard Create Bucket
Finally, run the tests.
./vendor/bin/sail php artisan test
Conclusion
In this post, mainly we learned how to run multiple Laravel projects on the same PC using the Laravel Sail. After that, we learned to write test cases to check whether all the services are properly running or not. What do you think about this post? Let us know your thoughts about this post in the comments section below.